

Table of Contents
How long does grout take to dry?
After your grout dries, it’s important to leave it alone for 24 hours. During this time, the alkali in the grout reacts with oxygen to form carbon dioxide and lime. Any excess moisture evaporates, leaving behind a hard, dry surface that resists stains and odours. Once this happens, you can seal your grout with a sealant or paint it if you want to hide its appearance.
Besides, walking on your grout flooring is okay if you don’t track dirt through the cracks. Although not ideal, it’s also not that big of a deal if you see it only once yearly.
Letting grout dry for 24 hours is usually enough time for most homeowners. If you have porous surfaces like tile or stone that can trap moisture, ensure they get sealed before letting them sit for too long.
If you’re wondering how long grout takes to dry, it depends on the type you use.
- Cement Grout: This type is common for homes. It feels like sand and needs water mixed in before use. It has stuff that stops it from soaking up too much water. Because of this, it takes about 3 days (72 hours) to dry. Cementitious grout has two types: sanded grout and unsanded grout.
- Epoxy Grout: This one is tough to put on and costs more. But it lasts longer and fights stains, grease, and weather changes. You don’t have to seal it like cement grout. It dries faster, usually in about one day (24 hours).
- Furan Grout: Used in big projects, it’s similar to epoxy grout but made differently. It usually dries in about one day (24 hours), too.
| Sr No. | Type Of Grout | Drying Time |
| 01 | Cementitious | 72 hours |
| A | Sanded Cementitious | 72 hours |
| B | Un sanded Cementitious | 72 hours |
| 02 | Epoxy | 24 hours |
| 03 | Furan | 24 hours |
A step-by-step guide to grouting tiles
There are following steps to follow when you grout your tiles.
Preparing the surface
Grouting can be messy, so preparing your surface first is important. First, ensure that the area around the grout lines is dry and free of dust or debris. Next, use floor wax to protect against stains and spills.
Mixing the grout
There are two types: a premixed type that you will use on porous surfaces and a DIY version that you mix yourself. First, measure enough water for both types to fully submerge the sand (about 1 gallon). Then stir in the detergent until no more bubbles come up from it. Next, add about 2 cups of admixture (borax + sodium tripolyphosphate) for every 5 gallons of water you have in total. It remains dissolved and doesn’t clump together when you pour it into the container or mixer. You should also mix in about 1/4 cup of super glue for every 4 cups of borax. It will help keep any clumps from forming when you mix up your grout batch later.
Muddling up your grout
Once everything gets mixed properly, pour your mixture into a bucket or bowl with a cover. So it doesn’t fly everywhere and gets all over your workspace while mixing it up. Next, stir your mixture with a stick (or mixing paddle) until all lumps are gone before moving on to step 4 below.
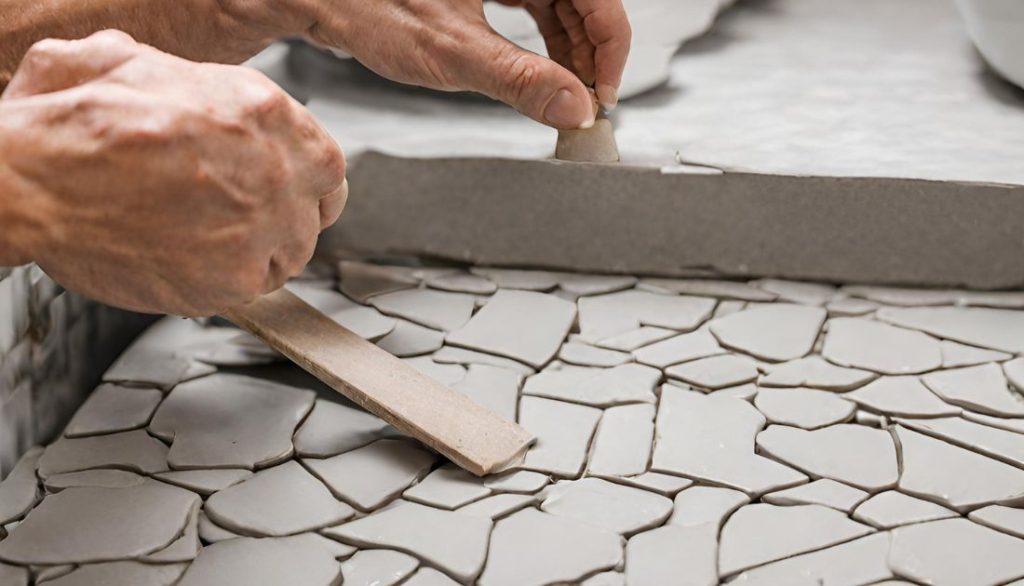
Applying the grout
Use a rubber grout float to apply the grout between the tiles. Hold the float at a 45-degree angle and work the grout into the joints, filling all the spaces.
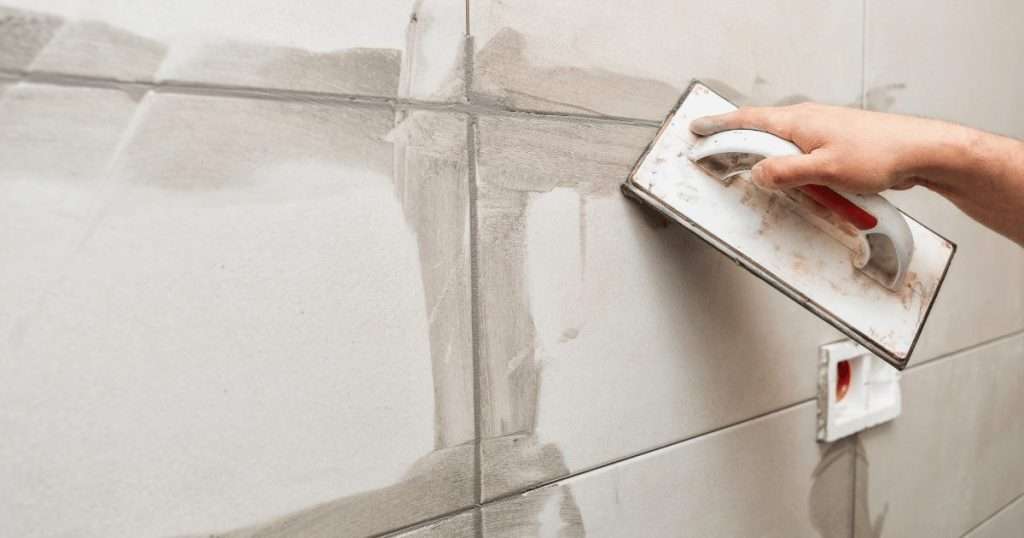
Wiping off excess grout
Once you have applied the grout to all the joints, use a damp sponge to wipe off any excess grout from the surface of the tiles. Rinse the sponge frequently to avoid spreading excess grout back onto the tiles.
Allowing the grout to set
Allow the grout to set for at least 20 minutes. During this time, the grout will begin to harden, and you will be able to see the joints starting to fill in.
Cleaning the tiles
Once the grout gets set, use a clean, damp sponge to wipe away any remaining grout residue from the surface of the tiles. Rinse the sponge frequently to avoid spreading excess grout back onto the tiles.
Allowing the grout to dry
After you have finished grouting, it is important to allow the grout to dry completely before walking on it or applying any finishes. It can take anywhere from a few hours to a few days, depending on the type of grout, humidity and temperature of a room.
How long to wait before using the tiled surface
After the grout dries for 24 hours, you can walk on it and use it. Just be sure not to track dirt through the cracks.
Exploration of the factors that can impact the drying time of grout
The factors that can impact the drying time of grout are temperature, humidity, contact time, and sealant.
Temperature:
The air’s moisture affects how long it takes for grout to dry. The higher the humidity level, the longer it will take for your grout to dry.
Humidity:
More humid conditions allow water vapour to enter your material’s pores. It makes it more difficult for grout to dry because moisture cannot evaporate as fast as in low humidity levels.
Contact Time:
How long you leave grout exposed before you seal or paint it will impact how quickly it dries. For example, if you have a wet piece of scotch tape on a section of your wall for 20 minutes, it’ll take longer than if you just put on a coat for over 2 hours.
Sealant:
Sealants typically get applied after 24 hours, forming an impermeable film over the surface that prevents water from penetrating the material beneath. However, it’s important not to use a sealant too soon because this could prevent oxygen from reacting with alkali, where reactions lead to carbon dioxide and lime formation.
Ambient conditions can play a role in grout dry time.
Different things around can make grout dry faster or slower. The kind of grout you pick is just one thing that affects how long it takes for grout to dry. The dampness and how hot or cold the room is also matter.
For example, if a bathroom has a lot of moisture, the grout for the tiles will take longer to dry compared to a bathroom with less moisture.
Likewise, the room’s temperature also affects how fast the grout dries. If the humidity levels are the same, grout usually dries quicker in a warm room than in a cold one.
It’s harder to control the conditions outside, so grout used outside usually takes longer to dry than grout used inside.
Comparison of different types of grout
There are four types of grout, each with its own drying time. Vitrified (a type of poured concrete), epoxy, polymeric and tile-reinforced grouts all have different drying times.
For example, Tile-Reinforced Grouts dry faster than Regular Grouts. Vitrified Grouts dry in 45 to 60 minutes, while Polymeric takes 24 hours. The Epoxy type of grout is the slowest drying type; it takes 24-72 hours or more to dry.
Determining the best grout for a particular project
Drying time is the most important factor. If you have a project that will take days or weeks, consider using a grout that dries quickly. If the grout can’t dry enough for your project, you’ll need more sealant and paint to mask the grout lines.
Moreover, if you want to prevent stains from setting in, there are other factors to consider. For example, whether your grout gets exposed to water or inside a wet basement, high humidity, or both will make it more difficult for stains like mud or mildew to set in. Better sealing materials can also help prevent stains from setting longer than 24 hours after grouting.

Collection of expert tips and tricks for speeding up the drying time
Grout takes a long time to dry. But don’t worry. There are ways to speed up this process so you can avoid waiting too long.
- Use a hairdryer or a heat gun to dry the grout. It will help evaporate the moisture more quickly, speeding up the drying process.
- Use a fan to increase air circulation in the room. It will help to dry the grout more quickly by removing excess moisture from the air.
- Avoid using too much water when mixing the grout. Using too much water can result in a longer drying time because it will take longer for the excess moisture to evaporate.
- Use a rapid-setting grout. These grouts get designed to be set more quickly than regular grouts, so they help speed up the drying process.
- Apply a grout sealer. It will help to protect the grout from moisture, which can speed up the drying process and help to prevent the grout from cracking or chipping.
- Please wait for the grout to dry completely before walking on it or applying any finishes. It will help to ensure that the grout is fully cured and ready to use.
Overall, the key to speeding up grout drying time is to remove excess moisture and increase air circulation. By following these tips and tricks, you can help to ensure that your grout dries as quickly as possible.
Importance of allowing the grout to dry before using
First, it’s important to consider allowing the grout to dry properly. When grout dries, it forms a hard, long-lasting surface resistant to stains and odours. It also allows for easier cleanup, requiring less effort than cleaning tile with soapy water.
Not only does waiting for 24 hours give you this extra benefit, but it also ensures that the alkali in the grout reacts with oxygen to form carbon dioxide and lime. This hard surface helps your tiled surfaces last longer and resist stains and odours.
Second, if you allow the grout to sit for too long before using it, you may experience problems later down the road. Besides, if your grout has a lot of moisture when you first lay tile over top or sealant over the top, these areas can trap moisture. Anytime there is a high-moisture area in your flooring where traction gets compromised, there’s a risk of something happening later, like mildew, mold growth, or other damaging effects.
In most cases, this happens after several months because excess moisture can still be trapped underneath tiles even when they get sealed using two coats of sealant. But if you are careful about sealing from day one, chances are your floor will stay sealed for years without any issues from trapping excess moisture beneath tiles.
Third, it is important to ensure that the sealant is applied evenly and that any gaps or cracks in the floor get filled before sealing.
Finally, it is advisable to inspect the sealant periodically, and if any areas seem to be losing their seal, reapply the sealant to maintain the protection. These simple steps can help keep your tiles sealed for years and prevent any issues from moisture trapped beneath them.
Troubleshooting guide for those who experience issues with their grout drying
Depending on the type of grout you used, it could take upwards of 24 hours for your grout to dry. And if you have porous surfaces like tile or stone that can trap moisture, ensure they are sealed first before letting them sit for too long.
However, if you don’t go over every inch with a sealant or paint to hide its appearance, there is a chance that stains and odours will come back later. So once your grout has dried, go over and seal or paint every inch of it.
A case study with a solution featuring a grout drying problem
My Neighbour in this case study had a problem with their grout drying too slowly. To fix this issue, they took the following steps:
- They began by removing any excess grout that still needed to get set. It involved using a damp sponge to wipe away any grout that was still soft and malleable.
- They then ensured that the grout was not exposed to direct sunlight or other heat sources. It would help to keep the grout from drying too quickly.
- They then applied a sealant to the grout to help protect it from moisture and other elements. It would also help protect the grout from any dirt or debris affecting its drying time.
- They followed up by using a dehumidifier to ensure the air in the room was not too humid. Humid air can slow down the drying process of the grout.
- Lastly, they used a fan to help circulate the air in the room and promote faster drying of the grout.
After taking all of these steps, my neighbor could fix their issue with the grout drying too slowly successfully.
Tips on how to clean the grout, seal, and avoid damaging the grout

Cleaning grout can be tough, but it can be much easier with the right techniques and products.
Here are some tips on how to clean and maintain grout:
Start by sweeping or vacuuming the area to remove loose dirt or debris.
Next, make a cleaning solution by mixing warm water and mild detergents, such as dish soap or a grout cleaner. You can also use a mixture of water and Distilled white vinegar (about 50/50) or a commercial grout cleaner.
Apply the cleaning solution to the grout using a soft brush, toothbrush, or sponge. Scrub the grout lines in a circular motion to loosen dirt and stains.
You may need a stronger cleaning product or a commercial grout cleaner for tough stains. Be sure to follow the instructions on the label and use caution when handling these products.
Rinse the area thoroughly with water to remove any remaining dirt or cleaning solution.
Here are some tips on how to seal the grout:
To seal the grout, you will need to use a grout sealer. It is a liquid applied to the grout lines and helps protect the grout from stains and moisture. To apply the sealer, follow these steps:
First, clean the grout thoroughly, as described above.
Then, allow the grout to dry completely.
Apply the grout sealer according to the manufacturer’s instructions. Then, use a clean, dry cloth or brush to apply the sealer evenly.
Allow the sealer to dry completely before using the area.
Here are some tips on how to avoid damaging the grout:
Using the correct cleaning products and techniques is important to avoid damaging grout with harsh chemicals or abrasive cleaning tools. For example, avoid using scouring pads or harsh abrasives, as these can scratch or damage the grout.
Instead, use a soft brush or sponge to clean the grout, and rinse the area thoroughly after cleaning to remove any remaining dirt or cleaning solution. It is also a good idea to test new cleaning products on a small, inconspicuous grout area before using them on the entire surface.
Conclusion
It’s not a good idea to let your grout dry overnight. It is recommended that your grout be allowed to dry for 24 hours before sealing it. If you leave it on too long, you could have stains or mould problems. Also, for the sealant or paint to work effectively, there must be enough time for the material to cure and harden.
FAQs
How long does grout take to dry? Standard drying times
The standard cement grout commonly stocked in hardware stores and used in residential settings typically requires 48-72 hours to cure fully. However, it’s crucial to ensure proper mixing. Excess water will extend drying time and compromise effectiveness.
Correctly mixed cement grout can achieve touch dryness within one to two hours, providing resistance against dust and debris. Nonetheless, full moisture resistance requires curing and strengthening over time.
Environmental factors like room temperature and humidity influence drying times. Higher humidity, common in bathrooms, prolongs drying. Cold environments or lack of heating also extend drying times for all grout types.
Compared to traditional cement grout, epoxy grout offers enhanced durability and strength. Being non-absorbent, it dries faster, typically within 24 hours.
How do you know when the grout is dry?
One straightforward approach involves visual inspection. Wet grout appears darker compared to its dry state, making the color contrast noticeable. This distinction is usually evident as grout is commonly applied in stages. Consequently, the initial batch dries faster than the final one, resulting in the earlier lightening of the first batch. However, it’s essential to consult the manufacturer’s instructions regarding the expected drying time.
How soon can I take a shower after putting in the grout?
It depends on the type of grout you used and if you plan to seal it. Usually, you should wait at least 72 hours to be sure the grout is fully dry and won’t get damaged by water. If you used epoxy grout, 24 hours should be enough.
If you’re sealing cement-based grout, wait until it’s fully dry, which also takes about 72 hours. After it’s dry, apply the sealer and wait another 24 hours. Remember, you’ll also need to caulk your shower to keep it waterproof.

What happens if grout becomes wet prior to curing?
If grout gets wet before it’s completely dry, it can cause problems. It weakens the grout, making it crumble and possibly detach. This can lead to water getting behind the tiles, which weakens the glue holding them. To fix this, you’ll need to take out the damaged grout and put in new grout for a better result.
When can I safely walk on freshly grouted floor tiles?
Different types of grout are suitable for different floor tiles, but a general rule of thumb is to wait at least 24 hours before walking on newly grouted surfaces. While it might be tempting to step on the tiles after just a couple of hours, doing so could damage the grout. It’s best to limit foot traffic on freshly grouted areas, especially in high-traffic spots, to allow the grout to fully set and ensure its longevity for years to come. Always check the manufacturer’s recommendations for specific curing times to achieve the best results.
My grout is still wet after 24 hours. Is this normal?
The most important and requested question arises sometimes: How long does grout take to dry? It is not normal for grout to remain wet for 24 hours after it gets applied. Grout should be allowed to dry completely before it gets subjected to moisture or use. If your grout is still wet after 24 hours, there may be a problem with the grout mix or the application process.
There are a few possible reasons why your grout may still be wet after 24 hours:
- You did not mix the grout correctly. Grout should be mixed with the proper amount of water to achieve a smooth, creamy consistency. If the grout is too wet, it may take longer to dry.
- The grout was applied too thickly. If the grout is applied in thick layers, it may take longer to dry.
- The room temperature is too low. To dry properly, grout must be applied in a room of at least 50°F (10°C). If the room is too cold, the grout may take longer to dry.
- The humidity is too high. High humidity can also slow the drying process of grout.
Moreover, if your grout is still wet after 24 hours, you should allow it to dry. However, due to one of the above-mentioned factors, it may take longer than usual for the grout to dry completely. Therefore, if the grout does not dry after an extended period, it may be necessary to remove and reapply the wet grout.
I’m in a hurry to use my newly tiled bathroom.
It is important to allow the grout and tiles to dry completely before using them, even if you are in a hurry. If the grout is still wet when you use the bathroom, it could become damaged or discolored.
However, if you are in a hurry to use your newly tiled bathroom, try increasing the ventilation in the room to help the grout dry faster. Then, increase the room temperature by turning the thermostat or using a space heater. Just be sure to follow proper safety guidelines when using any heating equipment.
Moreover, it is also a good idea to avoid walking on the tiles or applying moisture to the grout until it is completely dry. It includes avoiding using the shower, tub, or sink until the grout can cure fully.
Additionally, if you can’t wait for the grout to dry before using the bathroom, consider using an alternative bathroom until the grout has had a chance to dry and cure. It will help to ensure that the grout and tiles are not damaged or discolored by premature use.
How can I speed up the drying time of the grout?
There are a few ways you can try to speed up the drying time of grout:
First, increase ventilation: Increasing the airflow in the room can help the grout dry faster by removing moisture from the air. You can open windows or turn on a fan to increase ventilation.
Increase room temperature: Grout dries faster at higher temperatures. If the room is too cold, it may take longer to dry. Turn the thermostat or use a space heater to increase the room temperature. Just be sure to follow proper safety guidelines when using any heating equipment.
Use a hair dryer: Directing a hair dryer at the grout can help to speed up the drying process. Just keep the hair dryer moving and avoid focusing the heat on one area for too long, as this could cause the grout to crack or discolor.
Avoid moisture: Avoid applying moisture to the grout until it is completely dry. It includes avoiding using the shower, tub, or sink until the grout can cure fully.
It is important to note that grout can take several days to dry and cure fully, depending on the type of grout and the humidity and temperature of the room. Therefore, be patient and allow ample time to dry and cure the grout before using the area or applying any moisture to the surface.
How can the humidity and temperature in the room be adjusted?
There are a few ways you can adjust the humidity and temperature in a room:
- Humidity: To reduce humidity in a room, you can use a dehumidifier or open windows to allow excess moisture to escape. To increase humidity, you can use a humidifier or place bowls of water around the room to increase the moisture in the air.
- Temperature: To increase the temperature in a room, you can use a space heater or turn up the thermostat. To decrease the temperature, you can open windows to allow cool air to enter the room or use an air conditioner.
Moreover, it is important to monitor the humidity and temperature in a room to ensure that they are at optimal levels for the activities performed there. For example, if you paint or apply grout, you will want to maintain a moderate temperature and relatively low humidity to ensure the materials dry and cure properly.
How to use a grout sealer to protect the grout from moisture?
To use a grout sealer to protect the grout from moisture, follow these steps:
- Clean the grout thoroughly, using a mild detergent and a soft brush or sponge. Be sure to remove any dirt or stains from the grout lines.
- Allow the grout to dry completely. It may take several hours or overnight, depending on the humidity and temperature of the room.
- Shake the grout sealer well and read the instructions on the label carefully. Some sealers must get mixed with water or other chemicals before use.
- Apply the grout sealer to the lines using a clean, dry cloth or brush. Be sure to apply the sealer evenly, covering all the grout lines.
- Allow the sealer to dry according to the manufacturer’s instructions. It may take several hours or overnight, depending on the type of sealer and the humidity and temperature of the room.
- Once the sealer has dried, the grout should get protected from moisture. You can test the effectiveness of the sealer by applying a small amount of water to the grout. The sealer works properly if the water beads and does not soak into the grout.
It is important to reapply the grout sealer regularly to maintain its effectiveness. The frequency of reapplication will depend on the type of sealer and the amount of traffic the area receives. Be sure to follow the manufacturer’s recommendations for reapplication.